There's strictly no warranty for the correctness of this text. You use any of the information provided here at your own risk.
Shortcircuit is a software sampler, a VSTi for Windows 32, by the Swedish company Vember Audio. As it has has been discontinued, it can now be downloaded for free. The version to use is
There has also been a version 2.x, but it hasn't been fully developed, so it shouldn't be used. Please go for version 1.1.2.
Usually, you run VST-instruments (such as Shortcircuit) from inside a DAW ("Digital Audio Workstation"), a music-application such as Cubase, Ableton or Reaper.
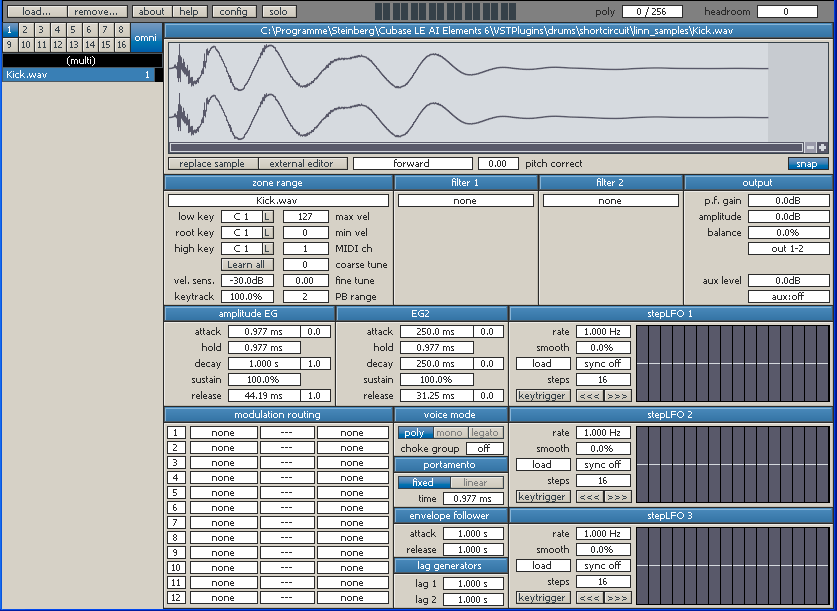
Here's a screenshot of the VST. In the following, I'll often refer to it from now on:
The screenshot makes Shortciruit look rather uninviting. But remember: When you first saw an Emulator II, the word "beautiful" probably wasn't the first thing that came to your mind. Maybe samplers just look kind of prosaic at first glance. Maybe that's normal. Maybe that's a good sign.
The first step to use Shortcircuit is loading a sample. In the upper left part of the user interface (see screenshot above) is a small button "load".
When it is clicked, the open-file-dialog opens, where you can select a sample.

You can use the key 'a' to listen to the loaded sample.
In Shortcircuit, a sample is contained in a "zone" (all the samples loaded at the moment are called a "multi"). The term "zone" refers to the zone of the sample on a music-keyboard. Think about splits of your music-keyboard:
Shortcircuit lets you realize all three cases.
In the "zone range"-section of the user interface (in the upper part, more on the leftern side; see screenshot), the zones of the samples on the music-keyboard are defined.
On the leftern side, you see the entry-fields "low key", "root key" and "high key" there:
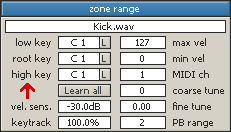
With "low key", you set, where the keyboard-zone of a sample starts. And with "high key" where it ends.
So in the first case you would load the piano sample, and then set
low key: C0
high key: C7
And you're done: You can play the piano-sample all across the keyboard. Because the zone of sample on the keyboard is then defined from C0 to C7, which should be the whole range of the keyboard.
In the second case, you would set "low key: C0, high key: B1" for the bass-sound, and "low key: C2, high key: C7" for the piano sound.
For the drumkit, you would set
low key: C1
high key: C1
for the bass-drum, and "low key: D1, high key: D1" for the snare-drum. And so on.
It's not that complicated, really. And it's extremely flexible. Do you remember, how cool it was, that you could realize just one keyboard-split on the Roland Jupiter 8? Or how Alan Wilder (of Depeche Mode) had several sample-zones on his E-Mu Emax in the movie "101"? Well, Shortcircuit gives you just that. In two tiny entry fields.
There are several ways to enter values into the entry fields (like the entry field "low key").
The entry field "root key" in the "zone range"-section defines the pitch of the sample relatively to the music-keyboard.
If you have a bass drum with "low key: C1, high key: C1" for example, setting "root key" to C1 too means, that the sound at C1 is played at the normal pitch (that you would also hear, when you open the sample in a sound-editor like Audacity).
When you increase the value for "root key", the pitch of the sound at C1 becomes lower.
When you decrease the value for "root key", the pitch of the sound at C1 becomes higher.
In the "output"-section on the right side of the user interface (see screenshot), the volume of the selected sample is defined.
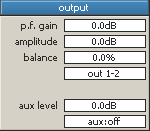
This is especially useful, when you create a drumkit. The volumes of the drum-sounds can be set individually here.
In the "output"-section, the samples can be panned individually in the stereo-spectrum.
For mono-samples, there's an entry field "pan" with a range from "-100%" (left) to "+100%" (right).
For stereo-samples, there's an entry field "balance" instead of "pan" (like on the screenshot).
What happens, if the zone-ranges of two samples overlap or if two samples have the same zone-range, like both "low key: C1, high key: C1" for example? Then both samples get played at once. So this way, layers can be created.
When you have loaded a drum-kit for example, and Shortcircuit receives the midi-data of a whole drum-pattern (for the whole kit), you can't hear a single sample well, that you may want to change. So you need a way to make Shortcircuit just play a certain sample, although it receives midi for many other samples too. This is done by soloing the sample. Press the button "solo" in the upper bar, right of the "load"-button:

In the middle of the upper part of the user interface, there is a graphical representation of the sample.
Just below of it, there is a small field showing the word "forward".
If you click on it, several options for looping the sample are shown.
If you select "loop forward" for example, you can then set loop-points inside the sample-window.
If the loop-points include the whole sample, the sample is played again and again, as long as you press a key on the midi-keyboard.
If you set the starting loop-point more further into the sample and then press a key on the midi-keyboard, the sample is played from the beginning to the loop's end-point, then returns to the loop's start point and is then played again and again between the two loop-points.
This is especially useful, if the sample is taken from an instrument, that is usually played in longer notes, like a string-sound for example. If the sample isn't that long, but you want to play longer notes with it, without looping, the sample would cut out too early. With looping, you can to some extent simulate, that the sample is longer than it really is. Of course the result sounds a bit artificial then, but sometimes that even has its own character.
Looping samples is a typical use of a sampler.
In Shortcircuit, saving data is quite straight-forward .
When you right-click on the left side of the user interface (in the area below the list of the samples), a menu of options for saving appears.
If you select "Save Multi", after choosing a file-name, a file with the suffix ".scm" is saved. It contains all the settings of the "multi", that is of all the samples, that are loaded into Shortcircuit at the moment.
It saves just the settings of Shortcircuit, not the samples (".wav"-files") themselves. There is an option for saving them too, but I found, it doesn't work very well. So I just use "Save Multi" to get the ".scm"-file, and manage the ".wav"-files separately (with an external file-manager).
A really nice feature of the ".scm"-file is, that it just contains XML-code. XML is a format to represent complex data in a text-file.
So, the ".scm"-file is just a plain text-file (containing XML-code). That means, if necessary, you can also edit it by hand (if you know what you are doing: In XML every single character has to be in place, otherwise the whole file will not work as a data-source). Or it can be edited from a script (written in a programming-language such as Perl or Python). If you know, how to program in such a programming-language, having access to the sampler-data by script is a really cool and powerful feature of Shortcircuit.